Overview
CLSim is a simulation software package that utilizes OpenCL to propagate photons from
I3Particles or flashers. These are done in a series of steps that are managed by three
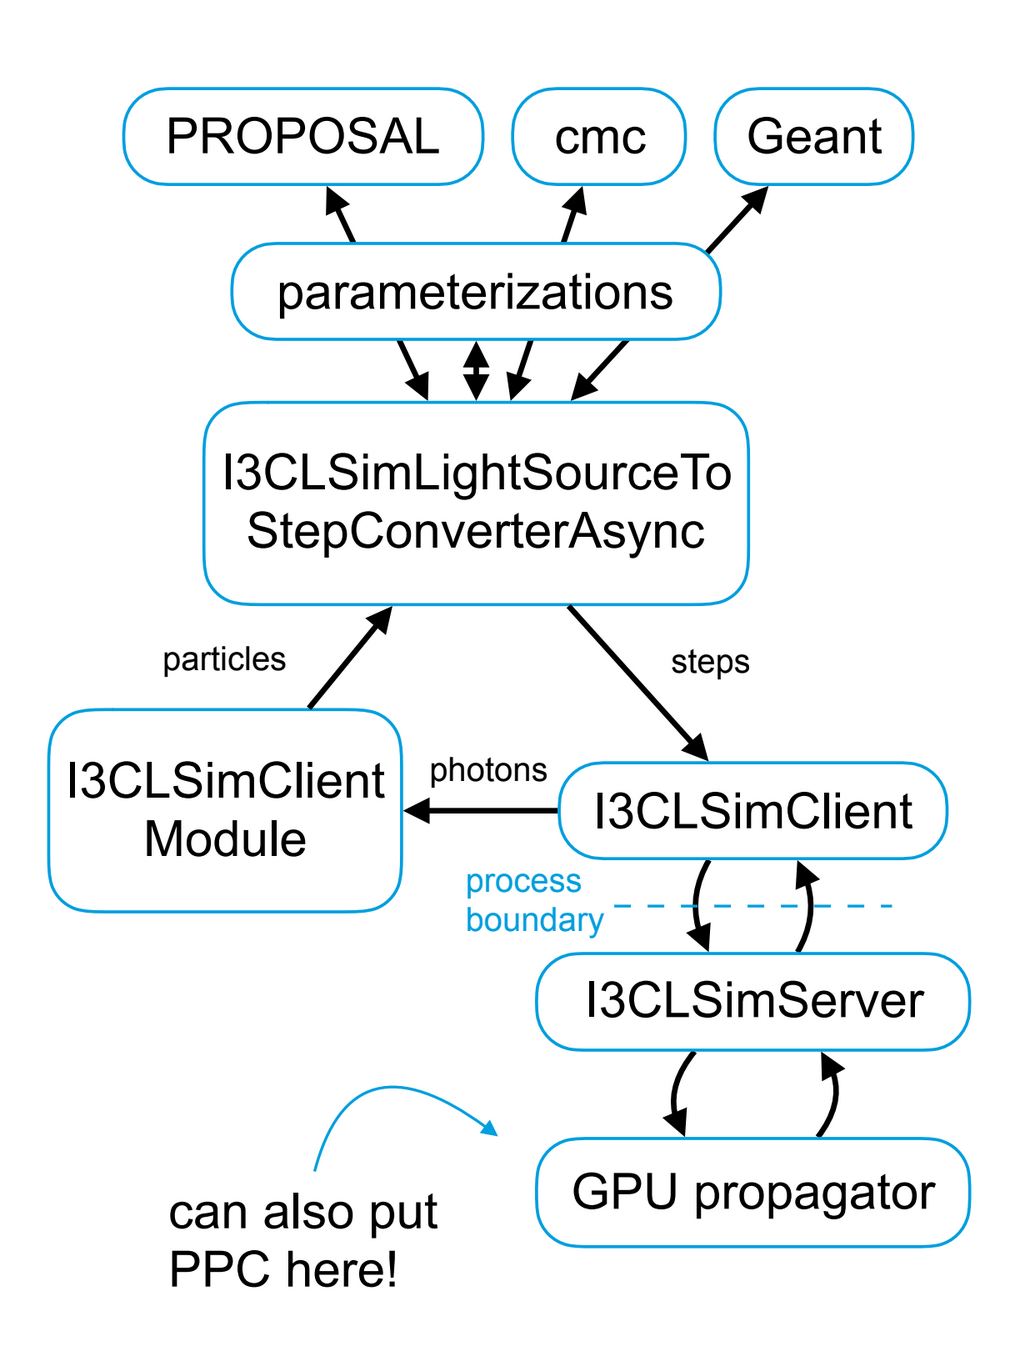
main classes, I3LightSourceToStepConverterAsync, I3PhotonPropagationClientModule, and I3PhotonPropagationClient.
Each of these work together to take particles, produce light-emitting steps and produces
photons that are converted into hits or photoelectrons on DOMs.
CLSim main function is to parallelize the conversion of light sources to steps and also steps to photons. The code even takes in multiple frames at once to run on and sorts them back into their proper event ID after finishing.
Light Source to Steps
The first step in clsim is to convert “light sources” into a series of light-emitting “steps”. Each of these steps has a constant speed of \(\beta = v/c\). For each of these steps a Cherenkov angle is given to determine the direction of the photons emitted. These photons are then given a random azimuth angle. Finally a distribution is sampled to determine the number of photons emitted ( usually 0-5 photons but can vary). This section will outline the different classes that are responsible for the conversion of light sources to steps.
There are different conversion methods available in clsim. By default, steps are created using a full Geant4 simulation, but alternative parameterizations can be used to speed up the process. Note that Geant4 tends to get very slow at higher energies (\(E>10 TeV\)). The current version of clsim comes with a parameterization that is compatbile to “ppc” (i.e. uses the same math as ppc). Parameterizations can be used for only a subset of particles and energies. There is a clsim option, called crossover, that will switch between which converter is used (Geant4 or ppc parameterizations) depending on the energy. Using crossover is a front end switch that will pick which converter can be used for that event, so it will not be discussed here as the focus is on the converters themselves.
Below are paths to the conversion files and other light source pieces of the code. Under their paths are brief descriptions of what the file contains.
- Location of Light SourceToStep conversion files:
clsim/private/clsim/I3CLSimLightSourceToStepConverterFlasher.cxx
clsim/private/clsim/I3CLSimLightSourceToStepConverterPPC.cxx
private/geant4/I3CLSimLightSourcePropagatorGeant4.cxx
sim-services/private/clsim/I3LightSourceToStepConverterAsync.cxx
sim-services/private/clsim/I3LightSourceToStepConverter.cxx
clsim/private/clsim/I3CLSimLightSourceToStepConverterUtils.cxx
- Other Light Source files:
sim-services/private/clsim/I3LightSourceParameterization.cxx
clsim/private/clsim/I3CLSimLightSourcePropagatorFromI3PropagatorService.cxx
As mentioned above, clsim can adjust to flasher data. If flasher input is given, then I3CLSimLightSourceToStepConverterFlasher is used. If it is specified to use the PPC parameterization when clsim is called, then I3CLSimLightSourceToStepConverterPPC coverter is used. The class I3CLSimLightSourcePropagatorGeant4 converts the particles to steps using Geant4, which is the default converter that clsim uses.
I3LightSourceToStepConverterAsync sets up the converters. Specifically, it sets up the threads and initializes parameterization. It contains functions like SetPropagators, SetMediumProperties, SetWlenBias (wavelength bias), and SetMaxBunchSize. It also sets up the barriers, which are put in to help act as checkpoints.
I3LightSourceToStepConverter.cxx has the set and get functions for LightSourceParameterzationSeries. It also has GetConversionResult.
Steps to Photons
A step which is defined by the I3SimStep is the necessary object that will produce the photons that are then propagated. This is generated by the StepConverter classes above.
Once a set of steps is generated, they are uploaded to the compute device (i.e. CPU, GPU). The GPU runs “kernels “ in parallel that are responsible for creating photons from the steps, propagating them through ice layers and checking for collisions with DOMs. All photons that collided are saved with their full information (including direction, position of the DOM, wavelength, number of scatters, propoerties at it’s point of creation, …). Those photons are then sent back to the host, converted to I3FrameObjects (I3CompressedPhoton) and saved in the frame. In order to keep the GPU busy, multiple frames (==events) are simulated in parallel. The clsim module takes care of correctly re-assembling the events afterwards.
The output of the GPU simulation setup is thus a list of photons at the DOM surface. These photons still need to be converted into hits, which is done using a dedicated module. This module finally writes a I3MCPESeriesMap, compatible to all existing photon simulation output.
Photons to Photoelectrons
The I3CLSimModule is responsible for converting the photons into an I3MCPESeriesMap. This process is taken care of by the I3CLSimPhotonToMCPEConverter which takes a single ModuleKey/I3CompressedPhoton pair to an OMKey/I3MCPE pair (or nothing).
CLSim Diagram
Wavelength Acceptance
Every IceCube module has a wavelength acceptance curve. Conceptually, this specifies the quantum efficiency of the module to a given wavelength of light. The combination of glass and PMTs are most sensitive to the blue and near-UV light. But, the Cherenkov spectrum (the Frank-Tamm formula) is peaked in the UV. This means propagating the full Cherenkov spectrum is wasteful, since the majority of photons will be generated and propagated in a regime where they will never be detected. To circumvent this, the Cherenkov spectrum is weighted during the photon creation and propagation by a module’s Wavelength Acceptance curve. These weights are removed during photon-to-PE/hit conversion. The wavelength acceptance of the standard (blue) and high QE DOMs (orange) are plotted below.
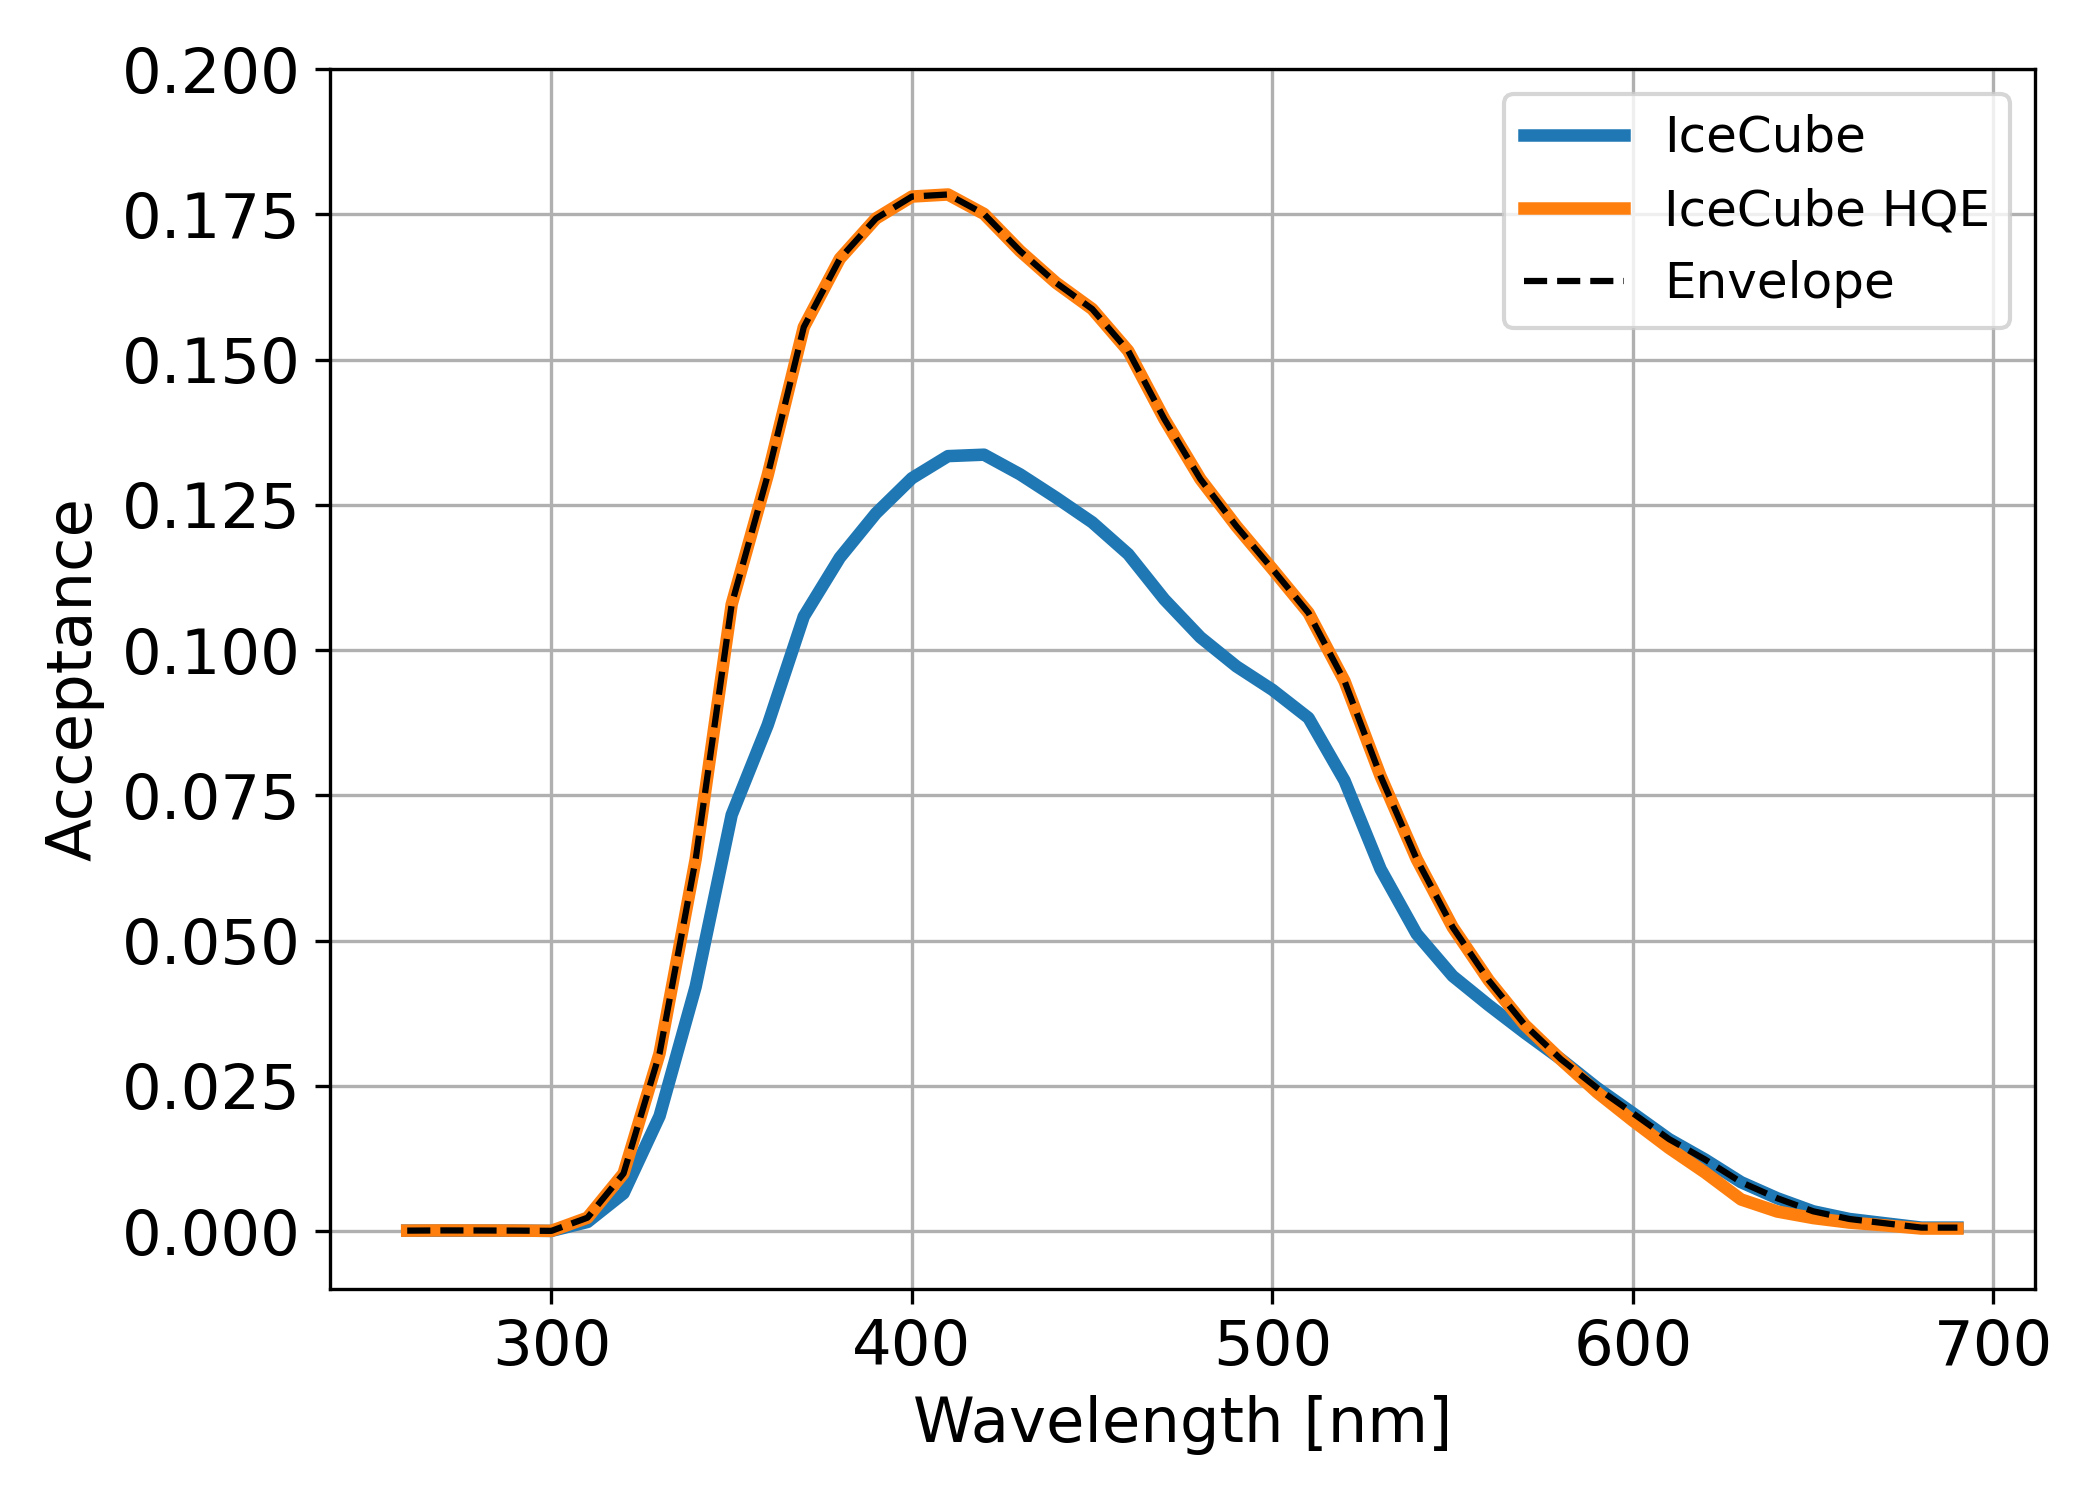
The wavelength acceptance of the standard and high-QE IceCube DOMs. The envelope of the two is also shown.
However, because we do not know which DOM a photon will hit, photons must be generated according to an envelope that encompasses all possibilities. The envelope for the standard IceCube and IceCube-HQE DOM is shown as the black dashed line in the above figure.
The WavelengthAcceptance may be passed to a CLSim directly through arguments; this is an option, for example, with I3CLSimMakePhotons. If the wavelength envelope is not provided, CLSim will create it internally when it calls the setupDetector method (for example, here). Because the average user will not pass the argument, CLSim will build the envelope internally during both photon propagation/generation and during photon to hit/PE conversion, and so this happens totally “behind the scenes.”
When the wavelength acceptance is constructed, several optional arguments are possible:
The relative DOM efficiency, rde (always set to 1)
An SPE compensation factor, spe_comp
An (abitrary) efficiency scaling factor efficiency_scale, usually set to 1
The SPE compensation factor, usually a factor of ~1.32, was added after the new SPE pulse model was developed. The factor preserves the effective DOM efficiency. It is a fudge factor that will in principle go away when/if the DOM efficiencies are themselves recalibrated.